

Most maintenance teams don't have a photo problem. They have a context problem. Techs snap plenty of pictures — the issue is that six months later nobody can prove when a photo was taken, which asset it belongs to, or whether the reading in the frame was before or after the repair. When an auditor, an insurer, or a plaintiff's attorney asks for it, the evidence falls apart.
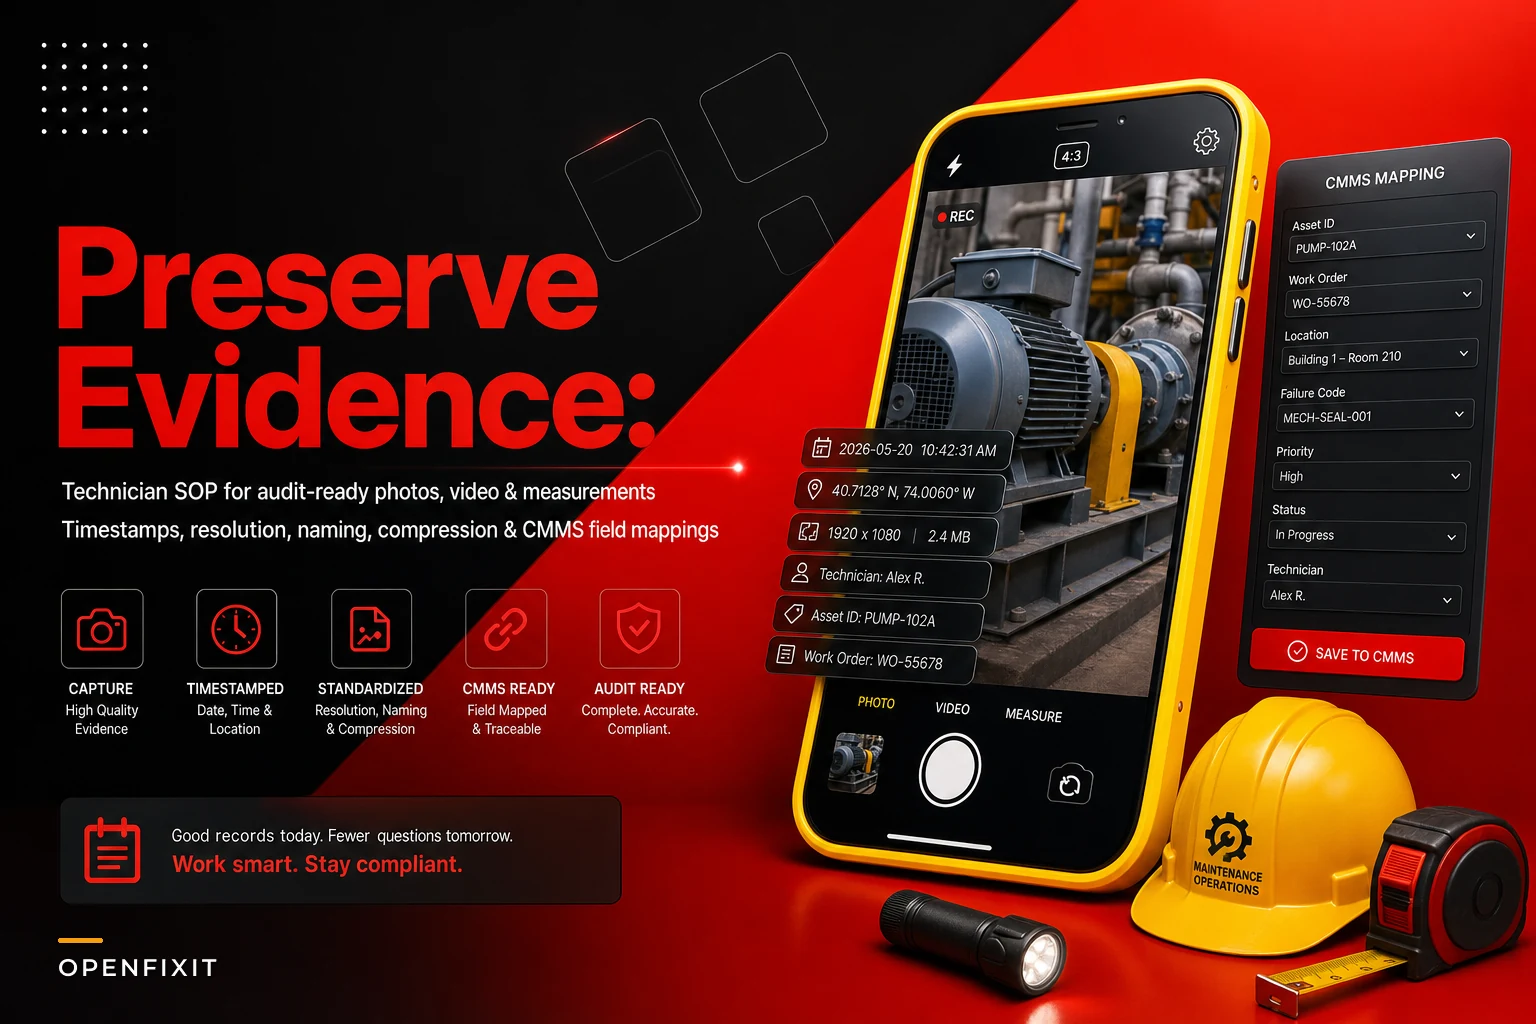
This is a technician-facing SOP for field evidence capture SOP CMMS work. It's deliberately narrow: how to capture, name, timestamp, and map photos, video, and measurements so the chain holds up and so the files actually land in the right CMMS fields instead of rotting in a camera roll.
If you want the policy layer behind this — who decides what's admissible and why — that's a separate document. This one is the hands-on procedure a tech follows on the floor.
Where field evidence quietly becomes worthless
Evidence doesn't fail at the moment of capture. It fails later, in the gaps.
A typical breakdown looks like this. A tech photographs a cracked bearing housing on a rooftop unit. The photo is fine. But it's stored on their personal phone, synced to a personal cloud account, with no asset tag in frame and no work order reference. The device clock drifted a few minutes because the phone auto-updated time zones during a site visit. The file gets texted to a supervisor, who screenshots it into an email, which strips the original metadata entirely.
-
Device clock drift. Phones and tablets silently adjust time. A measurement timestamped 14:32 might actually be 14:29, and when you're proving a reading was taken before a corrective action, three minutes can matter.
-
Metadata stripping. Every time a photo is forwarded, screenshotted, or pasted into a chat app, EXIF data — timestamp, GPS, device — gets wiped or altered.
-
Orphaned files. Photos sit in a gallery with no work order ID. Nobody can connect them back to the job without the tech personally remembering.
-
No before/after discipline. A single "after" photo with no matching "before" proves nothing about what the work actually changed.
-
Readings as loose numbers. A multimeter reading typed into a notes field, with no photo of the meter display and no unit of measure, is just an unverifiable claim.
Now you have a JPEG with no reliable timestamp, no device-of-record, no link to the asset, and two layers of re-encoding between the original and what's in the file. For an internal RCA, that's annoying. For an insurance claim or an OSHA inquiry, that photo is basically decorative.
The non-negotiable metadata every capture needs
Before anything gets stored, every piece of field evidence should carry a consistent set of attributes. Some come automatically from the device; others the tech has to add manually. The goal is that a file can stand alone and answer what, when, where, who, and why without anyone's memory filling in the gaps.
Eliminate downtime with proactive maintenance.
Openfixit helps you plan, track, and complete maintenance efficiently—maximizing asset reliability.
- Centralized asset management
- Automated maintenance scheduling
- Inventory and parts tracking
No credit card required
| Attribute | Source | Why it matters for audit |
|---|---|---|
| Work order ID | Tech enters / app auto-fills | Links evidence to the documented job |
| Asset ID / tag | In-frame tag and CMMS field | Proves which equipment, not just "a pump" |
| Capture timestamp (UTC + local) | Device clock, verified | Establishes sequence of events |
| Device identifier | Auto-captured | Shows chain of custody source |
| Capturing technician | Logged-in user | Accountability and attestation |
| GPS / site location | Device, where allowed | Confirms the work happened on site |
| Capture reason code | Tech selects (before/after/defect/reading) | Tells the auditor what they're looking at |
| Measurement value + unit | Tech enters alongside photo | Makes readings verifiable, not loose text |
The single most-skipped item on that list is the capture reason code. Without it, a reviewer has to guess whether a photo shows the problem or the fix. A dropdown with four or five options — Pre-work condition, Post-work condition, Defect/fault, Measurement/reading, Safety/isolation — removes that guessing entirely and costs the tech one tap.
Timestamp and resolution rules that actually hold up
Timestamps are where most "evidence" quietly collapses, so this part is strict.
Clock verification. Devices used for capture should sync to a network time source, not manual time entry. At the start of each shift, the capture app should confirm the device clock is within acceptable tolerance — a few seconds, not minutes — of the server. If it's off, the tech gets prompted before capturing anything. That one check kills the "my phone was on the wrong time zone" problem.
UTC plus local. Store both. Local time is what the tech reads and understands; UTC is what makes evidence comparable across sites and defensible when daylight-saving changes muddy the record.
-
Photos minimum 8 MP, no compression below the original. Defect close-ups should fill the frame — a crack in the corner of a wide shot is not evidence.
-
Video 1080p minimum, with audio on when the tech is narrating. A 20-second clip of a leaking seal with the tech saying the asset tag out loud is worth more than ten silent photos.
-
Measurement photos the meter display must be legible at full zoom. If the reading can't be read, it isn't captured.
No post-capture editing. Cropping, brightness adjustments, annotations — all of it should happen on a copy, never the original. The original file, with intact metadata, is the record. Annotated versions are derivatives and should be stored as such.
Naming conventions so files are findable in three years
Loose file names — IMG_4471.jpg — are how evidence gets lost. A structured name makes a file self-describing even if it ever gets separated from the CMMS.
[SiteCode]-[AssetID]-[WOID]-[ReasonCode]-[YYYYMMDD]-[HHMMSS]-[Seq]
Enforce automatic file-name generation in the capture tool so techs never have to type names.
A real example: NORTH-AHU07-WO48213-PRE-20260114-093412-01.jpg
The key discipline isn't the exact format — it's that the name is generated automatically by the capture tool, not typed by the tech. Hand-typed names drift within a week. Nobody keeps formatting consistent when they're on a ladder in July. The naming scheme should be enforced by the app so the tech never thinks about it.
Mapping captures to CMMS fields
This is the part teams skip, and it's the part that determines whether evidence is retrievable or buried. A photo attached as a generic file to a work order is better than nothing, but it isn't mapped — you can't query it, filter it, or pull all "pre-work defect" images across a fleet.
-
Work order record → evidence linked by WO ID, with reason code as a filterable field
-
Asset record → evidence also linked to the asset, so you can see every defect photo that asset has ever generated
-
Task/step level → where your CMMS supports checklist steps, attach the specific photo to the step it proves (e.g., the "verify belt tension" step holds the tension-reading photo)
-
Measurement fields → readings go into numeric fields with units, and the supporting photo links to that same reading
-
Reason code field → a dedicated, controlled-vocabulary field, not free text
When evidence is mapped this way, an auditor asking "show me every post-repair verification photo for Chiller 3 in the last two years" becomes a filter, not a two-day archaeology dig. This same structured-evidence approach is what makes a work-order–linked RCA playbook actually hold up — the RCA is only as strong as the evidence mapped to the failures behind it.
The capture workflow, step by step
Discipline on a busy day is what separates evidence that holds up from evidence that falls apart the moment someone scrutinizes it. The sequence below is built to be fast — each step takes seconds, not minutes, and most of the structural work happens automatically once the work order is open.
Open WO in app → Clock check passes → Pre-work capture → Defect/reading captures → Perform work → Post-work capture → Confirm mapping → Sync clears
-
Open the work order in the CMMS app before capturing. This is what auto-fills the WO ID, asset ID, and site code into the file name and metadata. Capturing outside the work order context is where orphaned files come from.
-
Verify the device clock prompt cleared at shift start. If the app flagged clock drift, don't capture until it's resolved.
-
Shoot the pre-work condition first. Get the asset tag in frame when possible. Select reason code Pre-work.
-
Capture defects and readings with reason codes. For any measurement, photograph the meter display and enter the numeric value with its unit in the linked field.
-
Do the work.
-
Shoot the post-work condition from a comparable angle. Reason code Post-work. A before/after pair from the same angle is far more persuasive than two random shots.
-
Confirm the files are attached and mapped to the correct work order and task step before closing the job. Don't close a WO with pending uploads sitting in the local cache.
-
Let sync complete. On low-connectivity sites, confirm the upload queue clears before leaving coverage.
The step that gets skipped most often is number seven. Techs close the job on their way to the truck and assume the files are there. Sometimes they are. Sometimes they're sitting in the local cache waiting for a signal that never comes. Check it before you leave.
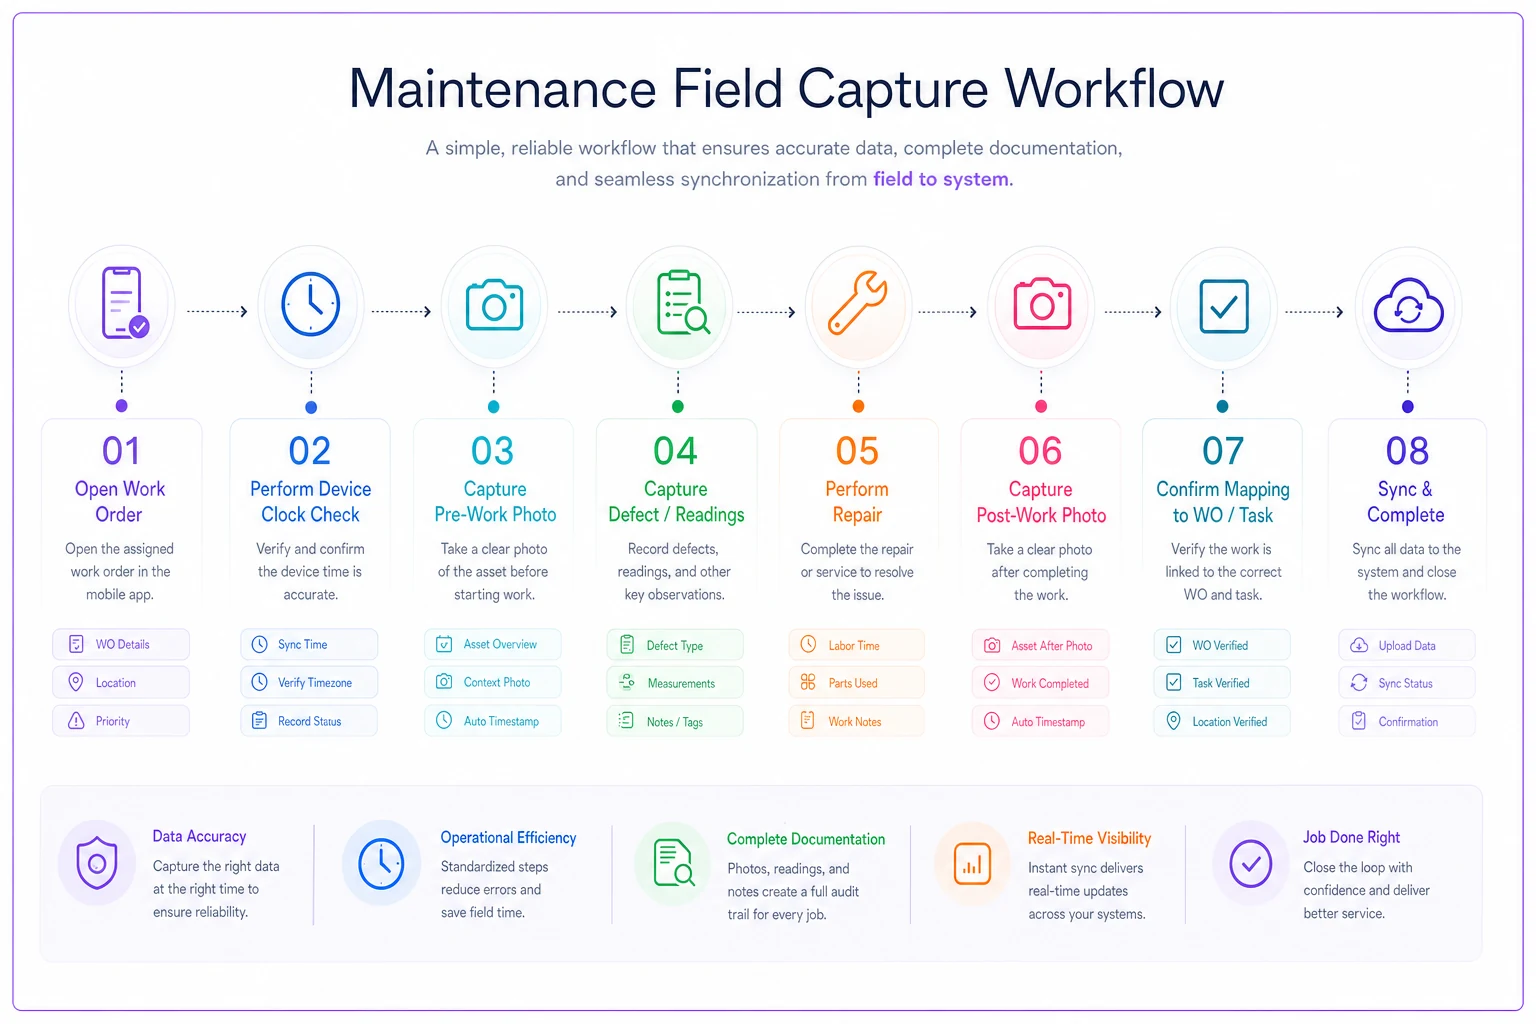
Use this sequence as the app's default flow so techs hit these steps in order without thinking about them.
A quick field checklist techs can actually use
A checklist only works if it's short enough that someone will actually run it. This one fits on a laminated card:
-
Work order open in the app before first photo
-
Clock verification passed at shift start
-
Asset tag visible in at least one frame
-
Reason code selected on every capture
-
Pre-work photo taken before touching the asset
-
Meter display legible on every reading photo
-
Measurement value + unit entered in the linked field
-
Post-work photo from a comparable angle
-
All files mapped to the correct WO and task step
-
Sync/upload queue cleared before leaving site
Print it. Laminate it. Stick it in the truck.
Retention rules: how long, and why it varies
Retention isn't one number. It depends on what the evidence supports, and getting this wrong means you either delete something you needed or hoard files that create legal exposure.
-
Routine PM verification photos retain for the asset's PM cycle plus one full cycle — enough to show trend and recent compliance. Often 2–3 years.
-
Defect and failure evidence retain through the corrective action lifecycle plus any warranty period on the repair. Tie deletion to the work order closure date, not the capture date.
-
Safety isolation / lockout evidence longer, typically aligned to your regulatory retention schedule — often 5+ years.
-
Anything tied to an incident, claim, or regulatory finding legal hold. These never get auto-purged, and the system should flag them so a retention job can't sweep them up.
The mistake to avoid is a blanket auto-delete rule that treats incident evidence the same as a routine filter-change photo. The retention logic has to read the reason code and the work order type, not just a date. This is the same discipline that protects you during a system migration — if you're moving platforms, the retention and linkage rules matter even more, which is why preserving auditability during a CMMS cutover depends on evidence that's already mapped and dated correctly before it moves.
A real scenario
A regional cold-storage operator with four warehouses kept losing warranty claims on compressor repairs. The pattern: a compressor would fail, the contractor would replace a part, and when the OEM pushed back on the warranty claim, the operator couldn't prove the failure condition or that the correct repair procedure was followed. They were eating somewhere between $12k and $18k a year in denied claims, plus the time spent arguing each one.
The fix wasn't new cameras. It was structure: techs opened the work order first, captured a mandatory pre-work photo with the nameplate in frame, photographed every pressure and temperature reading with the gauge legible, and shot a post-repair verification clip narrating the asset tag. Everything mapped to the work order and the asset, with reason codes.
Within a couple quarters, warranty denials tied to "insufficient evidence" essentially stopped. The claims that still got challenged were resolved faster because the OEM could see a clean before/after record with verified timestamps. The evidence disputes — which had been a constant low-grade drain — mostly went away.
When this level of rigor is overkill
Not every photo needs forensic treatment. If you're documenting a lightbulb swap, nobody's going to subpoena it. Applying the full metadata-and-retention discipline to trivial work just slows techs down and breeds shortcuts.
-
Safety-critical and lockout/tagout work
-
Anything under warranty where you may need to claim
-
Regulated assets (pressure vessels, fire systems, refrigeration)
-
Failures likely to recur or end up in an RCA
-
Contractor-performed work you need to verify
For routine, low-risk tasks, a single reason-coded photo mapped to the work order is plenty. The judgment call — which jobs get the full treatment — should live in your work order types, so the app enforces mandatory captures on high-stakes jobs and stays out of the way on the rest.
Who this breaks for
This SOP assumes techs are working inside a CMMS mobile app that can auto-fill context, enforce naming, and map captures to fields. If your team is still texting photos to a dispatcher or dropping them in a shared drive by hand, the naming conventions and field mappings above won't hold — people can't manually sustain this. The prerequisite is a capture-to-CMMS path that handles the structural work automatically, so the only thing the tech supplies is judgment: what to shoot, and why.
Get that foundation right and the evidence takes care of itself. Months later, when someone asks for proof, you're running a filter instead of digging through a camera roll and hoping.
Get that foundation right and the evidence takes care of itself. Months later, when someone asks for proof, you're running a filter instead of digging through a camera roll and hoping.
Ready to optimize your maintenance operations?
Join 2,000+ facilities using Openfixit to reduce unplanned outages, extend asset life, and improve operational efficiency.